Welcome!

Ciao! My name is Yolanda and I'd like to welcome you to my Blog! I have always had a love for cooking, baking and eating. This blog is mainly a place for me to record and share precious family recipes from those living and deceased as well as delicious recipes that my friends have given me throughout the years.

Translate

Tuesday, December 31, 2013

Carpinone Style Polenta

As most of you know, my mom was born and raised in the Region of Molise, Italy in a Little village of 1500 people called Carpinone.  Her village is surrounded by farm land, stone houses, spring water and beautiful mountains.  The majority of the people in this village are not at all rich, but the food they eat is fresh and home grown.  The food they served always depended on the season and what they sold at the market or found in their gardens.  One of those staple foods my mom grew up with was Polenta.  Polenta is basically corn meal and it can be made in many different ways.  In the town my Nonna (grandma) grew up in, a village called Castelpetrosa, they make their Polenta harder and then would slice it with dental floss like string and make a Lasagna with it.  In my mom's village Carpinone, they like it soft and it is eaten with fresh tomato sauce, made with fresh Mushrooms grown on top of the mountains and topped with Sausage.  My mom said they would eat this at least once a week and she remembers getting up early to make it with my Nonna.  They would cook it in a large pot over the fire in their fireplace.   Since this was a staple in her home growing up, of course it was also one in mine growing up as well, so I learned to love eating it. My mom always spread it out on a wooden board and topped it with sauce, grated cheese, and Italian Sausage.  When we had company they would request this, as it is not only delicious, but fun to eat together as well.  The other day my mom made this for my family and it was my husbands first time having it.  My whole family devoured it and my husband of course, being the carnivore that he is, ate a little bite and then just at all the sausage off the top.  I guess Polenta is just not his thing ha ha, but I was proud of him for trying it!  Next time  you have your family coming over, try making this, as it is a fun and rustic meal to share with your family or friends. 
Eating Polenta off the board as a child 

From Left to right: My Grandfather Sebastiano, me, my brother Sebastian, and my mother Lucia
Ingredients:
                                      
* 12 cups of water 
* 2 tsp of Sea Salt 
* 1 lb of Corn Meal 
* About 3-4 cups of sauce (my mom makes a homemade marinara with Shataki
Mushrooms
 * Freshly grated Parmesan cheese 
* About 5-6 Italian Sausage Links,sliced (baked or grilled (my mom baked hers with sweet bell peppers and sage) 
Procedure:
* Take your cooked Sausage, cut it into slices and set it aside or in the oven to stay warm.
*Fill a large pot with 12 cups of water until it comes to a boil
*Once it comes to a boil, add salt 
* Turn the heat on med low and slowly whisk the Polenta in the water a 
handful at a time, until all the Polenta is eventually in there. It is important to only do a handful at a time so that there are no lumps 
* This step should take about 15 minutes.
                               
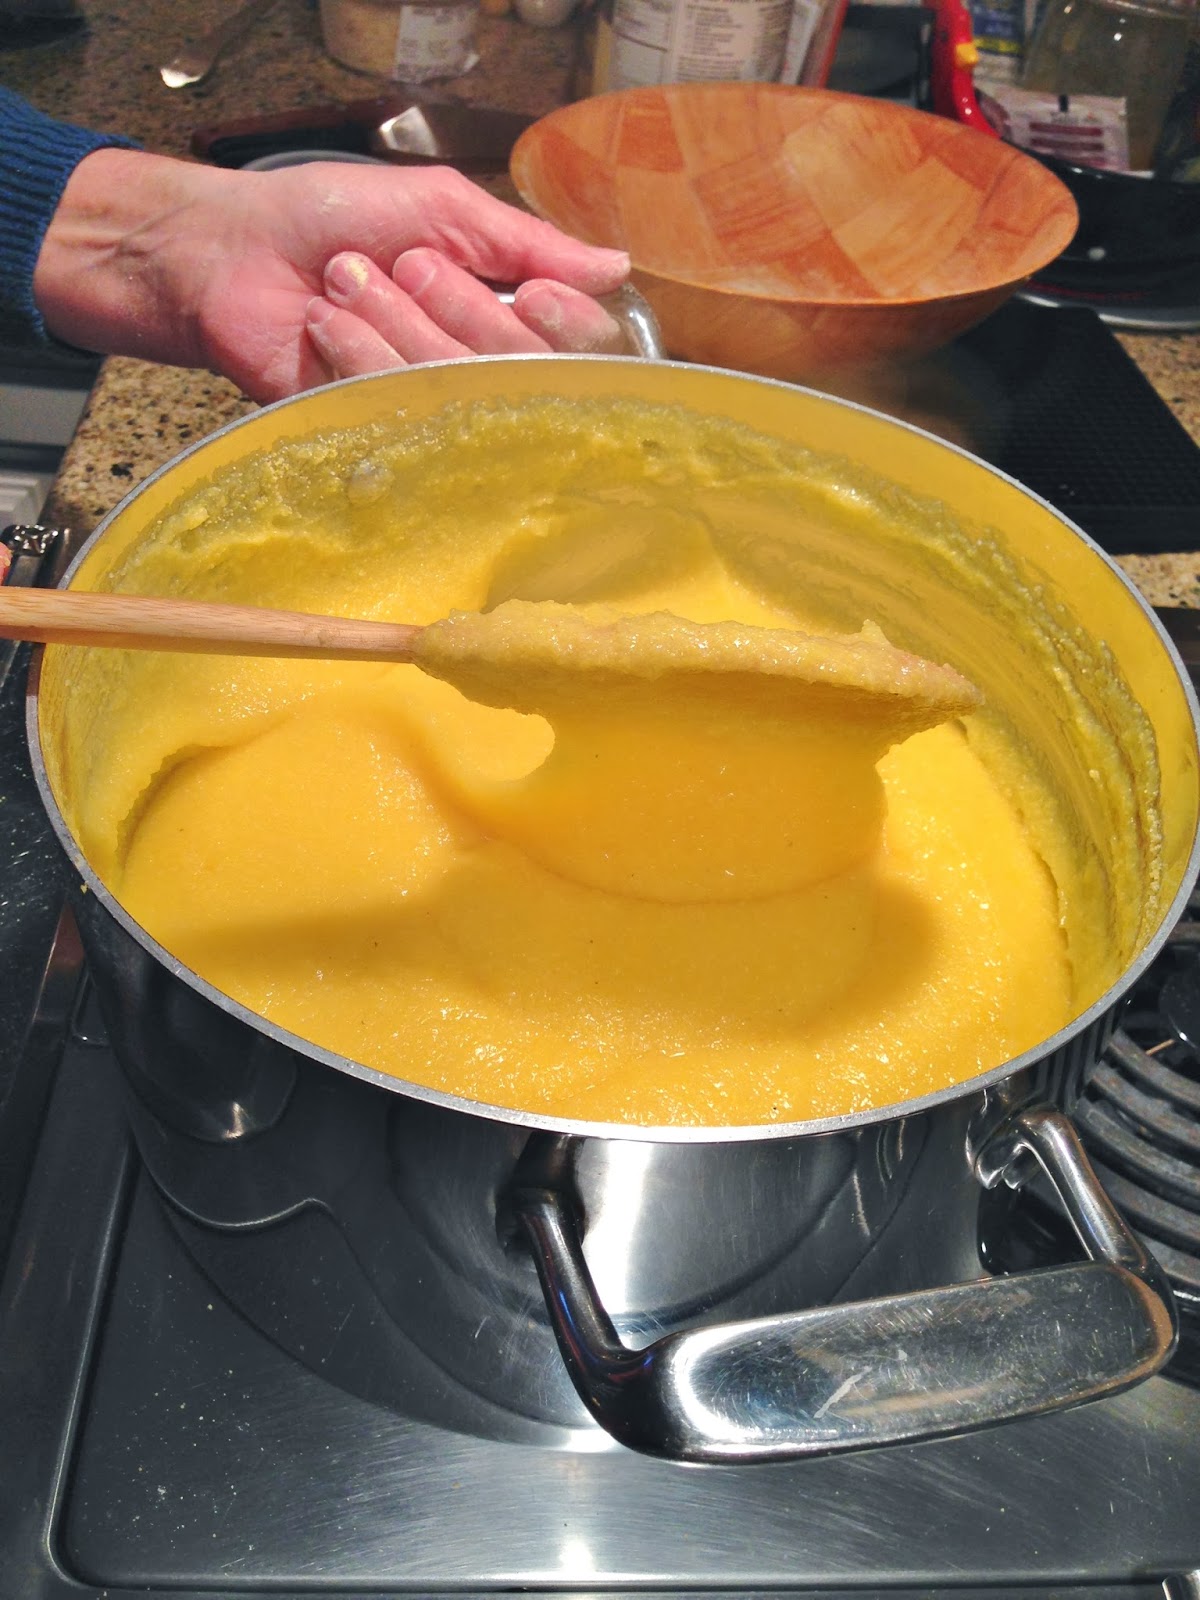
* Now switch to a wooden Spoon and let cook while continuing to stir for
another 15-20 minutes. Make sure you keep stirring it to prevent lumps.
(It may look done, but it's not. It is important to make sure the Polenta is 
well cooked)
                                                
* Next, spread the Polenta onto a Large Wooden Board (If you do not have a
large wooden Board, individual plates are fine.  
                 
* Spread a layer of sauce on top
* Generously sprinkle your Grated Cheese all over the top (half of the one 
shown has no cheese, because somebody didn't want any :/)
* Spread your Pieces of Sausage over the top.
* Enjoy eating this right off the board with a fork or get a spatula and serve
yourself some some onto a plate! Either way its delicious!
* A salad goes really well with this meal!

Saturday, December 28, 2013

Button Cookies

Last night I tried making another recipe from my husband's late grandmother's recipe box.  Usually I stick to making something I know I make good, but when I'm bored, I love to experiment and try a new recipe, until it comes out horrible and  I realize I just wasted money on ingredients in which I need to throw out.  In this case, the button cookies actually came out really good and they looked absolutely adorable! The flavor is a cross between a sugar cookie and a shortbread cookie and not too sweet at all.  The texture is slightly crunchy.  You could even spread chocolate in between two cookies if you wanted it to be sweeter.  These were fun to make and I am looking forward to trying out some more of Jimmy's grandmother's recipes hidden in that little wooden box!
Ingredients:
* 3/4 cup (12 TBSP) of Unsalted Butter at room temperature
* 1 Cup of Powdered Sugar
* 1 Egg
* 1 tsp of Almond Extract
* 2 1/2 C. of All Purpose Flour
* 1/4 tsp. of Salt
~*~Optional~*~ Food Coloring :(The recipe didn't call for it, but I thought they would look pretty colored, so I did)
Procedure:
* In a large bowl, mix the Butter and Powdered Sugar
* Add the Egg, Almond Extract and Salt and mix well.
* Add the Flour and mix until it forms a hard/dry dough
* At this point you can add your food coloring if you wish to. I used two different colors, so I had to divide my dough into two separate bowls.
* Cover the dough and let it chill in the fridge for 1 hour.
* Pre-heat oven to 350 degrees
* Next you will need a clean flat surface, a rolling pin, two circle cutters (I used the top of my non stick Pam spray and a 1 1/4 inch biscuit cutter) and a thin stick type tool to make the dots (I used a meat thermometer to poke the holes). Pretty much use whatever you have in your house that will make the button shape!
* Roll your dough out about 1/4 inch thick and cut the larger circles first (about 2 inch circle cutter)
* Lightly press the smaller circle cutter into the middle, making sure you do not cut all the way through.
                                     
* With your meat thermometer or toothpick, make the button holes.
* Put parchment paper onto a cookie sheet and lay cookies on the sheet. Bake for 9-10 minutes.
~*~Enjoy~*~

Saturday, December 21, 2013

Mom's Stuffed Mini Sweet Peppers

I am officially off for 2 weeks for the Winter break, so I will finally have some time to add some more recipes to my blog! I am excited to share my mom's recipe for stuffed mini sweet peppers.  These have been a hit every time she makes them and they are so good that like potato chips, you can't eat just one.  I have wanted her to show me how she makes them, because of course like most Italians she doesn't have a recipe; she just eyeballs her ingredients.  My friend Dominic had a "friends-giving" party and I wanted to bring these peppers, so I went over my mom’s house so that I could watch her make them and measure out the ingredients as she does it.  You will see that some of my pictures are taken at my mom's house (the ones with the gorgeous counter tops!) and some at mine (the ugly counter tops), because I distracted at one point and forgot to take pictures of some of the steps.  These peppers would make a great addition for Christmas Eve or any occasion.  I made them the other day just to eat during lunch at work.  
Tip: My mom also does this exact same procedure with Fresh tomatoes off the vine and they are delicious! 
Ingredients: 
(I forgot to put a picture of the Plain Italian breadcrumbs too)
* 1 (2lb) bag of Mini Sweet Bell Peppers (about 32 in a bag)
* 1/2 cup of Panko Breadcrumbs
* 1/2 cup of Plain Italian Breadcrumbs
* 1/2 Cup of Freshly Grated Cheese (I buy the Italian Blend, which is a mix of        Parmesan and Pecorino)
* 4-5 Cloves of Minced Garlic
* 1/4 cup of chopped fresh Parsley 
* 4 1/2 TBSP. of Extra Virgin Olive Oil plus more for drizzling over the peppers
* Salt and Pepper to taste
Procedure:
* Pre-heat your oven to 425 degrees
* Rinse the peppers
* With a pairing knife, cut the tops of the peppers off and scoop out the seeds
* Take out two 9x13 baking dishes and lay the peppers flat down on the pan (that is why you need to pans, so that they all have a spot).
* Drizzle the peppers with Olive Oil and massage them with your hands in the oil and set aside.
.... Now to make the stuffing
* In a medium bowl, add the Panko Breadcrumbs, Italian Breadcrumbs, Chopped Parsley, Minced Garlic, Grated Cheese, Salt, and Peppers.  Toss with a spoon.
* Add 4 1/2 TBSP of Extra Virgin Olive Oil and mix it up with your hands (The olive oil moisturizes the mixture).
* Stuff each pepper about 3/4 way full with a tiny spoon (I use an Espresso Spoon).
* Bake for 15 minutes and then lightly shake the pans around to make sure the peppers aren't sticking to the pan.
* Bake another 15 minutes (30 all together).
~*~Enjoy~*~

Sunday, November 17, 2013

Italian Flag Cookies

My favorite childhood bakery has and will always be Savoia's.  They have hundreds of fresh Italian cookies, cakes, pastries, breads and much more.  One of my favorite cookies they make is called the Neapolitan Cookie.  I have always called it the Italian Flag cookie, because it is the colors of the Italian flag (Red, White, and Green).  This cookie also goes by other names such as "tre colore," meaning three color and the "Seven Layer cookie," because of its seven layers.  For years I have been wanting to try and make this cookie and never really came across the recipe until now.  I recently found a video on how to make them on youtube.  I love watching recipes on youtube, because seeing a visual is always helpful!  I discovered that this is a very complicated cookie to make.  Mine came out really good, but I think I may just stick to buying them at Savoia's from now on, only because it took all day to make!
Recipe Source: http://www.youtube.com/watch?v=H3bhlnDJTyE
Please Click Here for Printable Version:
Ingredients:
* 8 Ounces of Almond Paste
* 1 1/2 Cups of Unsalted Butter at room temperature
* 4 Large Eggs
* 1 tsp. of Almond Extract
* 2 Cups of All Purpose Flour (I always use Gold Metal or King Arthur)
* 1/4 tsp. of Salt
* 1 Cup of Sugar
* 8 oz. of Apricot Preserves
* 8 oz. of Raspberry Preserves
* Green Food Coloring
* Red Food Coloring
* 12 Oz of Semi Sweet Melting Chocolate (I Mixed Dark and Milk)
Helpful Tools:
* Kitchen Aid Mixer
* 3- 9X9 inch pans (I used 3- 9X13 inch pans and I felt they came out too thin.  I would recommend 3-9X9 inch Pans instead).
* Wax Paper
* A Strainer
Procedure:
* Pre-Heat oven to 350 Degrees
* Get 2 small bowls and separate the Egg White from the Egg Yolks
* Put the Egg Yolks aside and the Egg Whites into the Kitchen Aid Mixer with the Whipping Attachment.
* Start on Med Low speed for 2 minutes and then on high speed for about another 5 minutes, until the Egg White form Large Peaks.
* Once the Egg Whites have formed the large peaks, add 1/4 cup of the sugar and mix for about another minute.
* Set aside.
 * Grab another Large Mixing Bowl and add the Paddle attachment to the Kitchen Aid Mixer
*  Add the Almond Paste and remaining 3/4 cup of sugar into the Bowl and mix until it is in Crumbs

* Add the Stick of Softened Butter and Almond Extract and Mix again.
* While the Mixer is running on Medium Speed, add the Egg Yolks one Egg at a time
* Turn the Mixer off and with a Spatula fold in the Egg Whites that you set aside earlier. 
* Fold in the Flour, one cup at a time until well blended.
* Grab three Bowls (the size of a cereal bowl) and divide the batter into three equal parts (I think it was about 1 1/4 cups of batter in each bowl)
* Put 20 Drops of Green Food Coloring into the first bowl and mix well
* Leave the second bowl of batter as is
* Put 20 drops of Red Food Coloring into the third bowl and mix well (do not use the same spoon you used with the Green)
* Line the bottom and sides of the three Pans with Wax Paper
* With a Spoon, spread the Green Cake  Batter into the first pan, the plain color cake batter into the second pan, and the Red Color Batter into the third pan.
* Bake for about 10-12 Minutes
*When Done, let cool
* While the cakes are cooling, get the jams ready.
* In a small sauce pan, heat the Raspberry Preserves
* Strain the Preserves over a bowl by pressing it around with a spoon in a strainer. Set aside.
* Heat the Apricot Preserved in a small sauce pan and Strain the Preserves over a bowl by pressing it around with a spoon in a strainer. Set aside.
* Now we are ready to assemble the cookie!
* Carefully Flip the Red Layer Cake over onto a Wax Paper covered tray.
* Slowly take the wax paper off of the top of the cake
* Spread the Raspberry Preserved all over the top of the Red layer cake
* Carefully add the Plain color cake to the top of the Red Jam Layer, and carefully rip the Wax paper off the top.
* Spread the Apricot Preserves on the top of the Plain color cake.
*Add the Green Color Cake to the top of the Apricot Preserve layer and carefully rip the wax paper off the top.
*Put a new sheet of wax paper on the top and then cover it with a heavy object (I put a wooden cutting board on top) and put it in the fridge for about 4-8 hours. (Sorry no picture of this step :( )
* When the cake is done settling in the fridge, melt the chocolate.
* Spread the chocolate all over the top of the cake and then put it back in the fridge to harden for about 15-20 minutes.
* Once that layer of chocolate has hardened, carefully flip the cake over and Spread melted Chocolate over the other side of the cake.  Put back into the refrigerator to harden. 
* When it is done hardening, place onto a cutting board trim all the sides of the cake (you can just munch on those scraps :))
* Cut the remaining cake into small squares or rectangles and Enjoy!